こんにちは。
現役エンジニアの”はやぶさ”@Cpp_Learningです。README.mdから簡単なメモまで、Markdownで書くことが多いです。またPythonで色んなコードを書いてます。
本記事ではPythonでMarkdownを扱い、README.mdや実験メモを作成する方法を紹介します。
Contents
Markdownとは?READMEとは?
Markdownについては以下の記事で説明済みなので、本記事では割愛します。

個人的にはMarkdownを使ってシンプルなREADME.mdを書くのが好きです。

実践!PythonでMarkdownを扱う
PythonでMarkdownを扱う…といっても特に難しいことはありません。
下記 text のようにMarkdownで書いた文字列を *.md で保存するだけです。
|
1 2 3 4 5 6 7 8 9 10 11 12 13 14 15 16 17 18 19 20 21 22 23 24 25 26 27 28 29 30 31 32 33 34 35 36 37 38 39 40 41 42 43 44 45 46 47 48 49 50 51 52 53 |
text = ''' # 見出し1 ## 見出し2 ### 見出し3 **太字** *斜字* ~~削除します~~ *** 線を引く --- * 箇条書き1 * 箇条書き2 * 箇条書き2.1 * 箇条書き2.2 * 箇条書き3 * 箇条書き3.1 1. 数字付き1 1. 数字付き2 ソースコードも書ける。実行はできない。 【Python】 ```python # コメント import numpy import pandas print('Hello World') ``` 【C言語】 ```c // コメント #include int main(){ printf("Hello World") } ``` ''' file_path = "./test.md" with open(file_path, 'w') as file: file.write(text) |
まぁこれだとPython使うメリットが全くありませんが…
『プログラムの処理結果をMarkdownで書いて *.md で保存できる』と考えれば、色んなことに応用できます。
実践!PythonとMarkdownでREADME.mdを作成する
*.mdをHTMLファイルに変換して展開したいケースもあるので、以下のコマンドで事前にライブラリをインストールしておきます。
pip install markdown
以降からコード書いていきます。
設定ファイル -info.json-
README.md テンプレートを参考に、”Name”や”Summary”などの情報を書いた設定ファイルを作成します。
|
1 2 3 4 5 6 7 |
{ "Name": "Physics_Sim_Py", "Summary": "Physics_Sim_Py is a tutorial of physics simulations with Python.", "Demo": "You can learn how to making cute physics simulations (looks retro game).", "Image_path": "./img/game.gif", "Features": "Please read [document](https://cpp-learning.com/readme/)." } |
この設定ファイルを本記事では info.json と名付けます。
作成したいREADMEに応じて、”Image_path”などを変更して下さい
PythonでREADME.mdとhtmlファイルを作成
README.md テンプレートの中でも頻繁に変更しない箇所なら、下記 TEMPLE のようにコードにべた書きするのもOKです。
|
1 2 3 4 5 6 7 8 9 10 11 12 13 14 15 16 17 18 19 20 21 22 23 24 25 26 27 28 29 30 31 32 33 34 35 36 37 38 39 40 41 42 43 44 45 46 47 48 49 50 51 52 53 54 55 56 57 58 59 60 61 62 63 64 65 66 67 68 69 70 71 72 73 74 75 76 77 78 79 80 81 82 83 84 85 86 87 88 89 90 91 92 |
import markdown import json TEMPLE = ''' # Author * Hayabusa * R&D Center * Twitter : https://twitter.com/Cpp_Learning # License [MIT license](https://en.wikipedia.org/wiki/MIT_License). Enjoy programming! Thank you! ''' def create_text(info: dict, temple : str='Thank you!') -> str: '''create markdown text from dict''' # get values of dict Name = info.get('Name', 'No name') Summary = info.get('Summary', 'unknown') Demo = info.get('Demo', 'unknown') Image_path = info.get('Image_path', 'No image') Features = info.get('Features', 'unknown') Note = info.get('Note', 'Nothing') # template nl = '\n\n' # temple = 'Thank you!' # markdown text text = '# ' + Name + nl + \ Summary + nl + \ '# DEMO' + nl + \ Demo + nl + \ '' + nl + \ '# Features' + nl + \ Features + nl + \ '# Note' + nl + \ Note + nl + \ temple return text def save_text(text: str, file_name: str="report"): '''save text with markdown and HTML file''' # markdown to html md = markdown.Markdown() html = md.convert(text) # print(html) # file name md_file_name = file_name + ".md" html_file_name = file_name + ".html" # path md_file_path = "./" + md_file_name html_file_path = "./" + html_file_name # save markdown with open(md_file_path, 'w') as file: file.write(text) # save html with open(html_file_path, 'w') as file: file.write(html) if __name__ == '__main__': # load json file_path = './info.json' with open(file_path, "r") as file: info_dict = json.load(file) ''' info_dict = { "Name": "Physics_Sim_Py", "Summary": "Physics_Sim_Py is a tutorial of physics simulations with Python.", "Demo": "You can learn how to making cute physics simulations (looks retro game).", "Image_path": "./img/game.gif", "Features": "Please read [document](https://cpp-learning.com/readme/)." } ''' # create markdown text from dict text = create_text(info=info_dict, temple=TEMPLE) # save text with markdown and HTML file save_text(text=text, file_name="README") |
このコードを実行すれば、 info.json や TEMPLE に書いた情報を参照して、README.md と README.html を作成できます。
Pythonで作成した README.html を公開するので、自由に閲覧してください。htmlファイルなら、専用エディタ不要(ブラウザのみ)で情報共有できるのが嬉しいですね。
辞書から情報を参照するときは get を活用し、指定したkeyが存在しない場合にデフォルト値を返すようにしています。今回の場合、info.json に”Note”の情報が無いので、デフォルト値の”Nothing”をREADME.mdに書いています。
実践!Pythonと実験メモを作成する
続いてPythonで実験メモ(*.md)を作成します。今回は palmerpenguins(ペンギン データセット)を使いたいので、以下のコマンドでインストールします。
pip install palmerpenguins
以降からコード書いていきます。
設定ファイル -penguin_info.json-
先ほどと同様に設定ファイルを作成します。今回は penguin_info.json と名付けます。
|
1 2 3 4 5 6 |
{ "Name": "Visualize palmerpenguins dataset", "Summary": "Flipper Length [mm] vs. Body Mass [g]", "Image_path": "./penguins.png", "Note": "[palmerpenguins|GitHub](https://github.com/allisonhorst/palmerpenguins)" } |
Pythonで実験メモ(Markdown)を作成
pandasでデータを読込んで、基本統計量の演算など任意の処理をしたり、matplotlibでデータを可視化した画像を保存します。
その処理結果や可視化画像をMarkdownで書き起こして、実験メモ(今回は penguin-visualization.md と名付ける)を作成するところまでを、Pythonコードのみで実施します。
|
1 2 3 4 5 6 7 8 9 10 11 12 13 14 15 16 17 18 19 20 21 22 23 24 25 26 27 28 29 30 31 32 33 34 35 36 37 38 39 40 41 42 43 44 45 46 47 48 49 50 51 52 53 54 55 56 57 58 59 60 61 62 63 64 65 66 67 68 69 70 71 72 73 74 75 76 77 78 79 80 81 82 83 84 85 86 87 88 89 90 91 92 93 94 95 96 97 98 |
import pandas as pd from matplotlib import pyplot as plt import json # import markdown from palmerpenguins import load_penguins def create_text(info: dict, table: dict, temple : str='END') -> str: '''create markdown text from dict''' # get values of dict Name = info.get('Name', 'No name') Summary = info.get('Summary', 'unknown') Image_path = info.get('Image_path', 'No image') Note = info.get('Note', 'Nothing') # template nl = '\n\n' # temple = 'Thank you!' # markdown text text = '# ' + Name + nl + \ Summary + nl + \ '' + nl + \ table + nl + \ '# Note' + nl + \ Note + nl + \ temple return text def save_text(text: str, file_path: str="./memo.md"): '''save text with markdown and HTML file''' # save markdown with open(file_path, 'w') as file: file.write(text) def create_figure(x, y, xlabel: str, ylabel: str, fig_title: str, file_path: str): '''create figure and save png''' # 図のサイズ設定 fig = plt.figure(figsize=(8,4), dpi=100) ax = fig.add_subplot(1,1,1) # プロット設定 ax.scatter(x, y, s=100, alpha=0.5, linewidths='2', c='#55C500', edgecolors='g') # 目盛りの文字サイズ設定 ax.xaxis.set_tick_params(direction="out", labelsize=16, width=3, pad=10) ax.yaxis.set_tick_params(direction="out", labelsize=16, width=3, pad=10) # 軸のラベル設定 ax.set_xlabel(xlabel, fontsize=16, labelpad=10, weight='bold') ax.set_ylabel(ylabel, color='tab:green', fontsize=16, labelpad=10, weight='bold') # グラフのタイトル ax.set_title(fig_title, fontsize=16, fontweight=16, weight='bold') # グリッド設定 ax.grid(True); # pngで保存 plt.savefig(file_path, bbox_inches='tight') if __name__ == '__main__': # json取得 file_path = './penguin_info.json' file = open(file_path, 'r') info_dict = json.load(file) # ペンギン データセット取得 df_penguins = load_penguins() print(df_penguins.head()) # 可視化したいデータ x, y df_Chinstrap = df_penguins[df_penguins["species"]=="Chinstrap"] y = df_Chinstrap["body_mass_g"] x = df_Chinstrap["flipper_length_mm"] # 軸のラベル設定 xlabel = "Flipper Length [mm]" ylabel = "Body Mass [g]" fig_title = "Chinstrap" img_path = "./penguins.png" # グラフをpngで保存 create_figure(x, y, xlabel, ylabel, fig_title, img_path) # 表をmarkdownで出力 df_describe = df_Chinstrap.describe() table = df_describe.to_markdown() # table = df_Chinstrap.to_markdown() print(table) # create markdown text from dict text = create_text(info=info_dict, table=table) # save text with markdown file save_text(text=text, file_path="./penguin-visualization.md") |
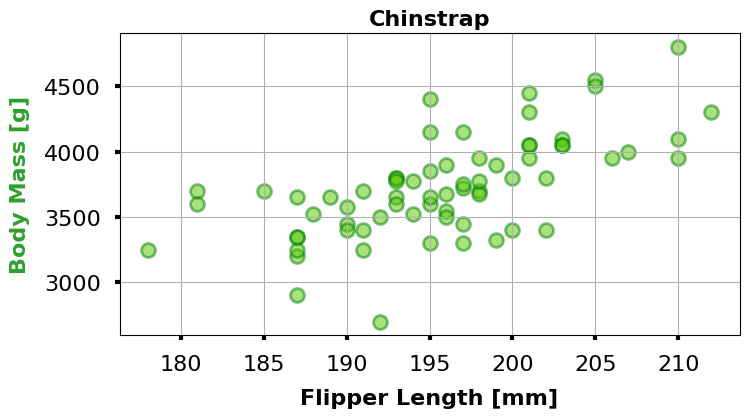
設定ファイルの情報・上図・基本統計量を算出した表などをMarkdownで書き起こして作成した実験メモが以下です。
上記の実験メモですが、README.html 同様に ライブラリ でMarkdown ⇒ html変換したところ、表が上手く変換できなかったので、エディタ(VSCode)を活用して手動で変換させました。
pandas.DataFrame.to_markdownを使って、データフレームをMarkdownに変換
まとめ
PythonでMarkdownを扱う方法を紹介しました。
また応用として Pythonコードで、README.mdや実験メモを作成する方法も紹介しました。
プログラミングの面白さや便利さが少しでも伝わると嬉しいです。
最後に『Pythonプログラミングを勉強したい!』という人のために、以下の記事を紹介します。
