こんにちは。現役エンジニアの”はやぶさ”@Cpp_Learningです。
今回はAutoMLライブラリのFLAMLを使い、機械学習モデルを自動作成する方法を紹介します。
Contents
AutoMLとは
AutoMLとは、Automated Machine Learningの略称で「手動で行っていた機械学習関連のあらゆる作業を自動化すること」を英語でクールに言ったものです。
本サイトで公開しているAutoMLの記事が以下です。


本稿はAutoML記事の第4弾になります。
FLAMLとは
FLAMLとは、Microsoft製の高速なAutoMLライブラリ(A Fast Library for Automated Machine Learning & Tuning)です。
特にFastの部分がポイントのようですが、詳細については公式サイトをご確認ください。
実践!FLAMLで機械学習モデルの自動生成
FLAMLで、どれだけ手軽に機械学習モデルを自動生成できるのか実践してみます。
インストール
最初に以下のコマンドで FLAML をインストールします。
pip install flaml
以降からコードを書いていきます。
Import
まずはimportから
|
1 2 3 4 5 6 7 8 9 10 11 12 13 |
import pickle import numpy as np import matplotlib.pyplot as plt from sklearn.manifold import TSNE from sklearn.datasets import make_classification from sklearn.model_selection import train_test_split from sklearn.metrics import classification_report, accuracy_score # import flaml from flaml import AutoML from flaml.data import get_output_from_log # from ray import tune |
【前準備】データセット作成
こちらの記事と同じデータセットを作成します。
|
1 2 3 4 5 6 7 8 9 10 |
# make dataset x, y = make_classification( n_samples=300, n_classes=2, n_features=5, random_state=0 ) # split dataset (train:test = 7:3) x_train, x_test, y_train, y_test = train_test_split(x, y, test_size=0.3, random_state=42) |
このコードで作成したデータが下図です(可視化コードは割愛)。
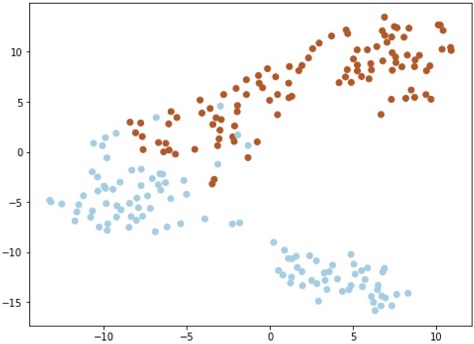
上図のデータ(2クラス)を分類するモデルを、FLAMLで自動生成します。
AutoMLの設定
最初に 探索時間、Metric、Task などを設定します。
|
1 2 3 4 5 6 7 8 9 10 11 |
automl = AutoML() settings = { "time_budget": 30, # total running time in seconds "metric": 'accuracy', # metric "task": 'classification', # task type # "estimator_list": ['rf','lgbm', 'xgboost'], # list of ML learners "log_file_name": 'automl.log', # log file name "log_training_metric": True, # whether to log training metric "seed": 1, # random seed } |
estimatorリスト を設定しない場合は、 以下がデフォルト設定(=探索対象)となります。
- lgbm
- xgboost
- xgb_limitdepth
- catboost
- rf
- extra_tree
- lrl1
手動ではツライ「複数の Estimator を比較する作業」を、AutoMLが自動でやってくれるので、「気になる Estimator 2~3個のみを比較したい」などの理由がないなら、デフォルト設定で良いと思います。
FLAMLがサポートしている Metrics や Estimators については、以下を参考にしてください。
学習&探索
scikit-learn 同様、 fit で学習 します。scikit-learn と異なる点は、「Estimator選定」や「ハイパーパラメータ調整」などの探索も fit で完結することです。
|
1 2 3 |
automl.fit(X_train=x_train, y_train=y_train, **settings) |
[flaml.automl: 03-05 02:47:52] {2068} INFO – task = classification
[flaml.automl: 03-05 02:47:52] {2070} INFO – Data split method: stratified
[flaml.automl: 03-05 02:47:52] {2074} INFO – Evaluation method: cv
[flaml.automl: 03-05 02:47:52] {2155} INFO – Minimizing error metric: 1-accuracy
[flaml.automl: 03-05 02:47:52] {2248} INFO – List of ML learners in AutoML Run: [‘lgbm’, ‘rf’, ‘xgboost’, ‘extra_tree’, ‘xgb_limitdepth’, ‘lrl1’]
[flaml.automl: 03-05 02:47:52] {2501} INFO – iteration 0, current learner lgbm
[flaml.automl: 03-05 02:47:52] {2617} INFO – Estimated sufficient time budget=432s. Estimated necessary time budget=10s.
[flaml.automl: 03-05 02:47:52] {2669} INFO – at 0.1s, estimator lgbm’s best error=0.0619, best estimator lgbm’s best error=0.0619
[flaml.automl: 03-05 02:47:52] {2501} INFO – iteration 1, current learner lgbm
[flaml.automl: 03-05 02:47:52] {2669} INFO – at 0.1s, estimator lgbm’s best error=0.0524, best estimator lgbm’s best error=0.0524
[flaml.automl: 03-05 02:47:52] {2501} INFO – iteration 2, current learner lgbm
(略)
[flaml.automl: 03-05 02:48:20] {2501} INFO – iteration 94, current learner lgbm
[flaml.automl: 03-05 02:48:20] {2669} INFO – at 28.2s, estimator lgbm’s best error=0.0190, best estimator lgbm’s best error=0.0190
[flaml.automl: 03-05 02:48:20] {2501} INFO – iteration 95, current learner extra_tree
[flaml.automl: 03-05 02:48:22] {2669} INFO – at 30.0s, estimator extra_tree’s best error=0.0333, best estimator lgbm’s best error=0.0190
[flaml.automl: 03-05 02:48:22] {2895} INFO – retrain lgbm for 0.0s
[flaml.automl: 03-05 02:48:22] {2900} INFO – retrained model: LGBMClassifier(colsample_bytree=0.5853444225011881, learning_rate=1.0,
max_bin=255, min_child_samples=10, n_estimators=4, num_leaves=5,
reg_alpha=0.04962236929536828, reg_lambda=1.4517932110796898,
verbose=-1)
[flaml.automl: 03-05 02:48:22] {2277} INFO – fit succeeded
[flaml.automl: 03-05 02:48:22] {2279} INFO – Time taken to find the best model: 8.27527928352356
CPU times: user 7.69 s, sys: 591 ms, total: 8.28 s
Wall time: 30 s
設定通りの30秒で学習および探索が終了しました。96回試行した結果、LGBMがベストモデルだったようです。
ベストモデルの確認
以下のコードでベストモデルの情報を確認できます。
|
1 2 3 4 |
print('Best ML leaner:', automl.best_estimator) print('Best hyperparmeter config:', automl.best_config) print('Best accuracy on validation data: {0:.4g}'.format(1-automl.best_loss)) print('Training duration of best run: {0:.4g} s'.format(automl.best_config_train_time)) |
Best ML leaner: lgbm
Best hyperparmeter config: {‘n_estimators’: 4, ‘num_leaves’: 5, ‘min_child_samples’: 10, ‘learning_rate’: 1.0, ‘log_max_bin’: 8, ‘colsample_bytree’: 0.5853444225011881, ‘reg_alpha’: 0.04962236929536828, ‘reg_lambda’: 1.4517932110796898}
Best accuracy on validation data: 0.981
Training duration of best run: 0.0111 s
今回の問題設定なら、ベストモデルを探索するのに 0.0111sec あれば十分だったようです。
AutoML ログ
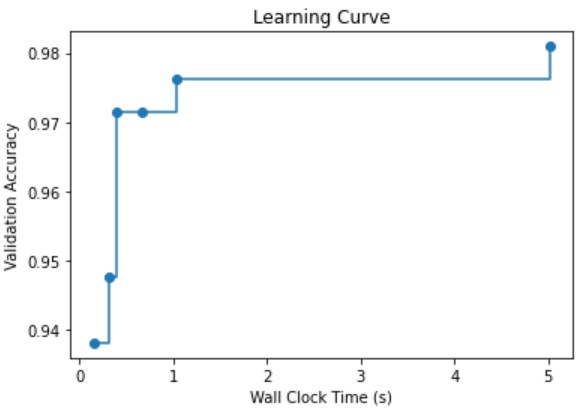
AutoMLの過程は automl.log に記録されます。以下のコードで可視化もできます。
|
1 2 3 4 5 6 7 8 9 |
time_history, best_valid_loss_history, valid_loss_history, config_history, metric_history = \ get_output_from_log(filename=settings['log_file_name'], time_budget=240) plt.title('Learning Curve') plt.xlabel('Wall Clock Time (s)') plt.ylabel('Validation Accuracy') plt.scatter(time_history, 1 - np.array(valid_loss_history)) plt.step(time_history, 1 - np.array(best_valid_loss_history), where='post') plt.show() |
feature importance(特徴量重要度)
以下のコードで feature importance(特徴量重要度)を可視化できます。
|
1 2 3 4 |
plt.barh( automl.model.estimator.feature_name_, automl.model.estimator.feature_importances_ ) |
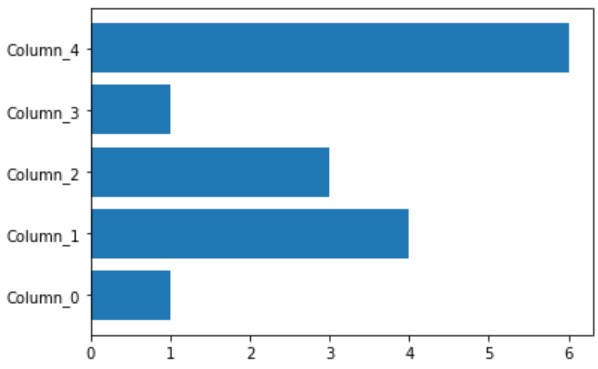
今回はダミーデータなので、重要な特徴量を把握した所で、何の旨味はありませんが、特徴量重要度や特徴量選定を重要視するケースもあります(下記参照)
推論
scikit-learn 同様に predict で推論 します。
|
1 2 3 4 |
y_pred = automl.predict(x_test) print('Predicted labels', y_pred) print('True labels ', y_test) # print(y_test-y_pred) # 真値と予測値の差分 |
Predicted labels [0 0 1 1 0 1 1 0 0 1 1 1 0 1 1 0 0 0 0 1 0 1 0 0 1 0 1 1 0 1 0 0 0 1 0 1 1 1 1 1 0 0 1 0 0 1 0 0 0 1 1 1 1 1 0 0 0 1 0 1 1 1 0 0 0 1 1 1 1 0 0 1 0 1 0 0 0 1 0 1 1 0 1 0 0 1 1 1 1 1]
True labels [0 0 1 1 0 1 1 0 0 1 1 1 0 1 1 0 0 0 0 1 0 1 0 0 1 0 1 1 0 1 0 0 0 1 0 1 1 1 1 1 0 0 1 0 0 1 0 0 0 1 1 1 1 1 0 0 0 1 0 1 1 1 0 0 0 1 1 0 1 0 0 1 0 1 0 0 0 1 0 1 1 0 1 1 0 1 1 1 1 1]
今回のテストデータの場合、真値と推論結果で異なるのは2か所でした。
モデルの評価
モデルの評価レポート作成には、scikit-learn のAPIを使うのが楽です。
|
1 2 3 |
# print precision, recall, f1-score, support print(classification_report(y_test, y_pred)) print("score:", accuracy_score(y_test, y_pred)) |
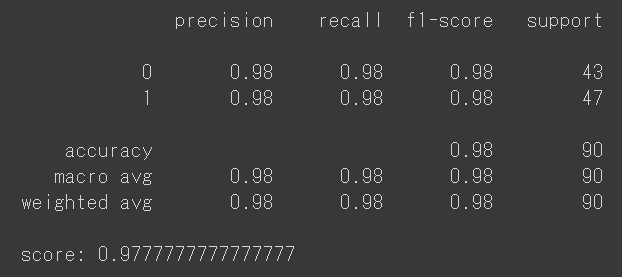
問題設定が簡単だった可能性もありますが、複数のEstimator のハイパーパラメータをチューニングしながら、ベストモデルの探索が30秒(=設定時間)で完了しました(前述した通り、結果的には 0.0111sec の探索時間で十分だったようですが)。
フクロウも人間も驚きの性能です。AutoML恐るべし、FLAMLすげー。
学習済みモデルの保存
学習済みモデルは、以下のコードで保存できます。
|
1 2 3 |
# pickle and save the model with open('automl.pkl', 'wb') as f: pickle.dump(automl, f, pickle.HIGHEST_PROTOCOL) |
FLAMLに関係なく、オブジェクトを pickle で保存するのは、よくやる処理です
学習済みモデルの読み込みと推論
先ほど保存した 学習済みモデル:automl.pkl を読み込んで、学習にも評価にも未使用なデータを分類するコードが以下です。
|
1 2 3 4 5 6 7 8 9 10 |
# load pickled model''' with open('automl.pkl', 'rb') as f: my_automl = pickle.load(f) # 適当なデータを作成 my_data = np.array([[1, 2, 3, 4, 5]]) # 推論 my_pred = my_automl.predict(my_data) print("result:", my_pred) # result is 0 or 1 |
result: [1]
以上で、FLAMLの実践は終了です。
まとめ -FLAMLで機械学習モデルの作成を自動化-
AutoMLライブラリのFLAMLを使い、機械学習モデルを自動作成する方法を紹介しました。
手動ではツライ、機械学習関連の以下の作業を自動化できるのが素敵でした。
- Estimator選定
- ハイパーパラメータ調整
- ベストモデル探索
他のAutoMLライブラリと探索速度を比較したことはありませんが、Fast な印象を受けました。

