こんにちは。
現役エンジニアの”はやぶさ”@Cpp_Learningです。仕事でもプライベートでも機械学習で色々やってます。
今回はPipelineライブラリ Luigi について紹介します。
Contents
Pipeline・Workflowとは
(厳密な定義は分かりませんが)データ処理におけるパイプライン・ワークフローについて、個人的には以下のように区別しています。
【パイプライン】
- データのやり取りをシームレスに実現する仕組み
- 特に機械学習モデルの研究・開発フェーズで威力を発揮
- 実験管理までサポートしているPipelineライブラリあり
【ワークフロー】
- データを扱うタスク間の連携をシームレスに実現する仕組み
- タスク連携が必要な多様なプロジェクトの運用フェーズで威力を発揮
- 以下のような機能をサポートしているWorkflowライブラリあり
- 周期実行などのスケジューリング
- タスク失敗時のリトライ
- タスクの成功/失敗をSlackなどに通知
- DAGの可視化
いずれも「データのやり取りをシームレスに実現する仕組み」なので…
- PipelineライブラリをベースにWorkflowを実現
- WorkflowライブラリをベースにPipelineを実現
などができます。ちなみにLuigiについては以下の通りです。
Luigi is a Python (2.7, 3.6, 3.7 tested) package that helps you build complex pipelines of batch jobs. It handles dependency resolution, workflow management, visualization, handling failures, command line integration, and much more.
引用元:Luigi公式ドキュメント
※2020/10/15時点
Pipeline・Workflowライブラリの比較と選定
ライブラリを選定する際は、メジャーなライブラリを比較している以下の記事が参考になります。
プロジェクト規模(20人以下で開発・運用)や要件を満たす必要十分な機能(リッチ過ぎない機能)などが選定のポイントになると思います。
【Lale】機械学習モデル開発向けのPipelineライブラリ
ハイパーパラメータの自動チューニングまでサポートしているPipelineライブラリもあります。
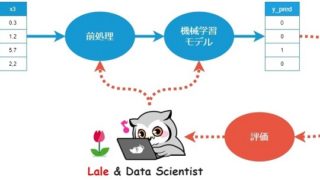
※正確にはData Scienceライブラリ Lale がパイプライン構築をサポートしています
ライブラリを正しく活用すれば、あらゆる業務を効率化できます
Luigiに関するTips集
Luigiについて”ググる”と多くの記事を見つけることができます。
公式ドキュメントと上記の記事を参考にすれば、やりたいことを実現できると思います。
むしろ情報が多すぎて欲しい情報を見つけるのが大変なので、備忘録の作成をオススメします。
以降で Luigi の使い方を紹介します。
実践!Luigiによるデータ処理ワークフロー開発
今回は下図のデータ処理ワークフローをつくります。

※データ取得 ⇒ データ処理A・データ処理Bを並行処理 ⇒ 結果出力(ローカルにファイルを保存)
データの入出力先はローカル以外に、データベースやAWS S3のようなクラウドストレージなどがあります。
インストール
最初に以下のコマンドで Luigi をインストールします。
pip install luigi
以降からコードを書いていきます。
Import
まずはimportから
|
1 2 3 4 5 |
import datetime import pickle import pandas as pd import luigi from luigi.mock import MockTarget |
タスクの作り方❶ -データ取得タスク-
luigi.Task を継承し、型に当てはめるだけでタスクをつくれます。
- requires:依存タスク(事前に実行するタスク)を記述
- output:出力先を記述
- run:本タスクの処理を記述
まずはデータ取得タスクをつくります。
|
1 2 3 4 5 6 7 8 9 10 11 12 13 14 15 16 17 18 19 20 |
class GetData(luigi.Task): # get param input_path = luigi.Parameter() filename = luigi.Parameter() def requires(self): pass # no requires def output(self): # return MockTarget(self.__class__.__name__, format=luigi.format.Nop) return luigi.LocalTarget('./tmp/GetData.pkl', format=luigi.format.Nop) def run(self): # get data inputfile_path = self.input_path + self.filename input_df = pd.read_csv(inputfile_path) # output input_df with the file path '.tmp/GetData.pkl' with self.output().open('w') as f: f.write(pickle.dumps(input_df, protocol=pickle.HIGHEST_PROTOCOL)) |
最初に実行するタスクなので requires はありません。run にはローカルに保存してあるCSVファイルを読み込み、任意の場所に出力する処理を書きます。処理結果の出力先は output に書きます。
各タスクの出力結果(中間データ)の保存が不要な場合、MockTarget を使えばオンメモリで完結します。
luigi.Parameter() については、以下で紹介します。
configファイル
Luigiを使う場合、jsonやyamlで設定ファイルを作成する必要はなく、以下のような config.cfg を作成すれば良いです。
|
1 2 3 4 5 6 |
[Sample] output_path = ./output/ [GetData] input_path = ./dataset/ filename = iris.csv |
[GetData]が先ほどのデータ取得タスクです。pythonコードで以下のように書けば、設定ファイルのパラメータを取得できます。
|
1 2 3 4 |
input_path = luigi.Parameter() filename = luigi.Parameter() |
※設定ファイルを読み込む方法については後述します。
タスクの作り方❷ -前処理タスク-
以下は前処理タスクAです。
|
1 2 3 4 5 6 7 8 9 10 11 12 13 14 15 16 17 18 19 20 |
class PreprocessA(luigi.Task): def requires(self): return GetData() def output(self): # return MockTarget(self.__class__.__name__, format=luigi.format.Nop) return luigi.LocalTarget('./tmp/PreprocessA.pkl', format=luigi.format.Nop) def run(self): # load data which GetData output with self.input().open('r') as f: input_df: pd.DataFrame = pickle.load(f) # preprocess with input_df, and make result_df. result_df = input_df.drop(columns=['SepalLength']) # output result_df with the file path '.tmp/Preprocess.pkl' with self.output().open('w') as f: f.write(pickle.dumps(result_df, protocol=pickle.HIGHEST_PROTOCOL)) |
前処理より先にデータを取得する必要があるので、 requires に GetData を書きます。
run には「ファイルのロード ⇒ 不要なカラムの削除(前処理) ⇒ 結果を保存」という処理を書きます(GetData の output が本タスクの input になります)。
今度は前処理タスクBをつくります(Aとほとんど同じ前処理です)。
|
1 2 3 4 5 6 7 8 9 10 11 12 13 14 15 16 17 18 19 |
class PreprocessB(luigi.Task): def requires(self): return GetData() def output(self): # return MockTarget(self.__class__.__name__, format=luigi.format.Nop) return luigi.LocalTarget('./tmp/PreprocessB.pkl', format=luigi.format.Nop) def run(self): # load data which GetData output with self.input().open('r') as f: input_df: pd.DataFrame = pickle.load(f) # preprocess with input_df, and make result_df. result_df = input_df.drop(columns=['SepalWidth']) # output result_df with the file path '.tmp/Preprocess.pkl' with self.output().open('w') as f: f.write(pickle.dumps(result_df, protocol=pickle.HIGHEST_PROTOCOL)) |
前処理タスクA 同様に GetData を先に呼びます。このように複数タスクが一つのタスクと依存関係にある場合でも、Luigiが よしなに処理してくれます。
排他制御などを気にせずタスク間の連携処理ができます
タスクの作り方➌ -Sampleタスク-
前処理A・Bの結果を結合し、最終結果として出力するタスクをつくります。
|
1 2 3 4 5 6 7 8 9 10 11 12 13 14 15 16 17 18 19 20 21 22 23 24 25 26 27 28 29 30 31 32 33 |
class Sample(luigi.Task): # get param output_path = luigi.Parameter() # get datetime date = datetime.datetime.now() datetime = date.strftime("%Y%m%d_%H%M%S") datetime = str(datetime) def requires(self): return {'a': PreprocessA(), 'b': PreprocessB()} def output(self): pass def run(self): # input a with self.input()['a'].open('r') as f: input_a: pd.DataFrame = pickle.load(f) # input b with self.input()['b'].open('r') as f: input_b: pd.DataFrame = pickle.load(f) # process (marge) df = pd.concat([input_a, input_b], axis=1) # save df with the file path './output/result_%YYYY%MM%DD-HH%MM%SS.csv' outputfile_path = self.output_path + 'result_' + self.datetime + '.csv' df.to_csv(outputfile_path, index=False) # Delete files in folder = './tmp/*' # shutil.rmtree('./tmp/') |
上記のように requires に複数のタスクを書くことができ、しかも並行処理してくれます。
後段タスクがないため、output には何も書かず、run の中でファイル出力まで書きました。
設定ファイルの読み込みとタスク実行
最後に設定ファイルの読み込みと、実行するタスクを記述します。
|
1 2 3 |
if __name__ == '__main__': luigi.configuration.LuigiConfigParser.add_config_path('./conf/config.cfg') luigi.run(['Sample', '--workers', '2', '--local-scheduler']) |
下図のように環境変数を編集すれば、上記のコードがなくても設定ファイルを読み込めます。

※環境変数の編集後はPCを再起動してください
–workesは並列処理用のオプションですが、処理内容やマシンスペック次第では、下手に並列しない方が速いかもしれません。

ひょっとしたら GetData ではなく、Sample を 実行している点に違和感があるかもしれませんが、依存関係のあるタスクを先に呼ぶと考えれば、、
- 「Sample ⇒ PreprocessA/B ⇒ GetData」 の順に呼ぶ
- 「GetData ⇒ PreprocessA/B ⇒ Sample」の順に実行
上記の二つは同じフローになります。
コード全体
今まで説明したコードをまとめ、main.py という名前で保存します。
|
1 2 3 4 5 6 7 8 9 10 11 12 13 14 15 16 17 18 19 20 21 22 23 24 25 26 27 28 29 30 31 32 33 34 35 36 37 38 39 40 41 42 43 44 45 46 47 48 49 50 51 52 53 54 55 56 57 58 59 60 61 62 63 64 65 66 67 68 69 70 71 72 73 74 75 76 77 78 79 80 81 82 83 84 85 86 87 88 89 90 91 92 93 94 95 96 97 98 99 100 101 102 103 104 105 106 107 108 109 110 111 112 |
# import shutil import datetime import pickle import pandas as pd # import numpy as np import luigi from luigi.mock import MockTarget class GetData(luigi.Task): # get param input_path = luigi.Parameter() filename = luigi.Parameter() def requires(self): pass # no requires def output(self): # return MockTarget(self.__class__.__name__, format=luigi.format.Nop) return luigi.LocalTarget('./tmp/GetData.pkl', format=luigi.format.Nop) def run(self): # get data inputfile_path = self.input_path + self.filename input_df = pd.read_csv(inputfile_path) # output input_df with the file path '.tmp/GetData.pkl' with self.output().open('w') as f: f.write(pickle.dumps(input_df, protocol=pickle.HIGHEST_PROTOCOL)) class PreprocessA(luigi.Task): def requires(self): return GetData() def output(self): # return MockTarget(self.__class__.__name__, format=luigi.format.Nop) return luigi.LocalTarget('./tmp/PreprocessA.pkl', format=luigi.format.Nop) def run(self): # load data which GetData output with self.input().open('r') as f: input_df: pd.DataFrame = pickle.load(f) # preprocess with input_df, and make result_df. result_df = input_df.drop(columns=['SepalLength']) # output result_df with the file path '.tmp/Preprocess.pkl' with self.output().open('w') as f: f.write(pickle.dumps(result_df, protocol=pickle.HIGHEST_PROTOCOL)) class PreprocessB(luigi.Task): def requires(self): return GetData() def output(self): # return MockTarget(self.__class__.__name__, format=luigi.format.Nop) return luigi.LocalTarget('./tmp/PreprocessB.pkl', format=luigi.format.Nop) def run(self): # load data which GetData output with self.input().open('r') as f: input_df: pd.DataFrame = pickle.load(f) # preprocess with input_df, and make result_df. result_df = input_df.drop(columns=['SepalWidth']) # output result_df with the file path '.tmp/Preprocess.pkl' with self.output().open('w') as f: f.write(pickle.dumps(result_df, protocol=pickle.HIGHEST_PROTOCOL)) class Sample(luigi.Task): # get param output_path = luigi.Parameter() # get datetime date = datetime.datetime.now() datetime = date.strftime("%Y%m%d_%H%M%S") datetime = str(datetime) def requires(self): return {'a': PreprocessA(), 'b': PreprocessB()} def output(self): pass def run(self): # input a with self.input()['a'].open('r') as f: input_a: pd.DataFrame = pickle.load(f) # input b with self.input()['b'].open('r') as f: input_b: pd.DataFrame = pickle.load(f) # process (marge) df = pd.concat([input_a, input_b], axis=1) # save df with the file path './output/result_%YYYY%MM%DD-HH%MM%SS.csv' outputfile_path = self.output_path + 'result_' + self.datetime + '.csv' df.to_csv(outputfile_path, index=False) # Delete files in folder = './tmp/*' # shutil.rmtree('./tmp/') if __name__ == '__main__': luigi.configuration.LuigiConfigParser.add_config_path('./conf/config.cfg') # luigi.run(['Sample', '--local-scheduler']) luigi.run(['Sample', '--workers', '2', '--local-scheduler']) |
以下のコマンドで main.py を実行します。
python main.py
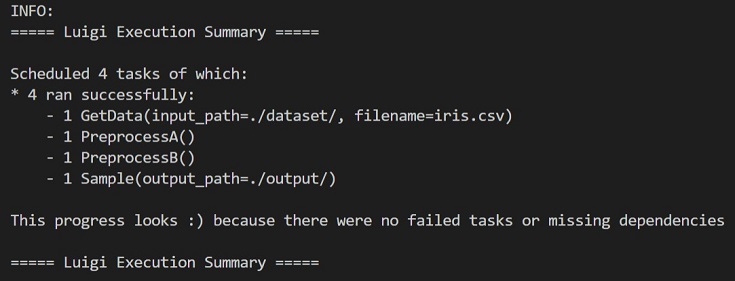
各タスクの処理が成功したときの表示が↑です。ニコニコ顔 🙂 が可愛いですね。
中間ファイルがtmpに、最終結果がoutputに保存されます(下記 階層参照)。
|
1 2 3 4 5 6 7 8 9 10 11 12 13 14 15 16 17 18 |
workspace │ ├─main.py │ ├─conf │ └─config.cfg │ ├─dataset │ └─iris.csv │ ├─output │ ├─result_20201011_222008.csv │ └─result_20201011_222050.csv │ └─tmp ├─GetData.pkl ├─PreprocessA.pkl └─PreprocessB.pkl |
Webアプリ
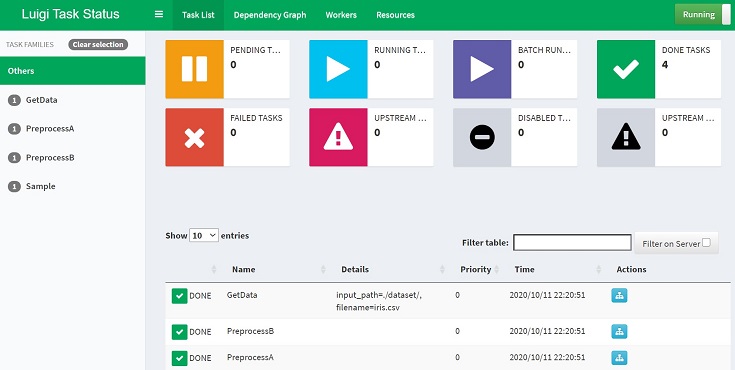
Luigiは以下のWebアプリをサポートしています。
前準備
環境変数を編集する(カレントディレクトリのパスをPYTHONPATHに含める)ことで luigi コマンドが有効になります。
これで以下のコマンドでも main.py を実行できるようになります。
luigi –module main Sample –local-scheduler
※ローカルスケジューラで起動
Webアプリ起動
以下のコマンドでWebアプリを起動できます。
luigid
適当なブラウザと http://localhost:8082 打ち込めばWebアプリが表示されます。
以下のコマンドで main.py を起動すれば、ワークフローの状態監視ができます。
luigi –module main Sample
今までの説明で登場した下図は、Webアプリでワークフローを可視化したものです。
 以上 Luigiの使い方まとめでした。
まとめ
Pipelineライブラリ Luigi によるデータ処理ワークフローをつくってみました。
全機能は紹介しきれせんでしたが、Luigi の基本的な使い方については網羅できたと思います。
本記事が参考になれば嬉しいです。ライブラリを正しく活用し、業務を効率化しましょう!


